Generating Six-Pack Abs With TensorFlow pix2pix

Visualizing results can be a powerful form of motivation and preparation. However, in the fitness domain, it can often be difficult to clearly see this future outcome. Can we use deep learning to bring people closer to their individual fitness goals by helping them visualize their future results?
This was the question that our team set out to tackle during the 48-hour Fitness & Health Burda Hackday in Munich, Germany on the weekend of October 7th, 2017.
Our idea: Dream up pictures that might plausibly resemble someone in the future should they adopt a lifestyle of healthy eating and exercise, using conditional generative adversarial networks.
In this post, I will first briefly outline GANs for the unfamiliar. Next, I'll provide some guidance for training one such model - a TensorFlow implementation - using the GPU training and deployment platform FloydHub. Finally, I'll share some best practices for integrating AI into your next hackathon project - which helped our team reach 2nd Place in the Burda Hackday.
Generative Adversarial Networks
Generative Adversarial Networks were first proposed by Ian Goodfellow and others in Yoshua Bengio's Montreal lab in 2014, and have received much attention since then, with Yann LeCun calling them:
...the most interesting idea in the last 10 years in ML, in my opinion.
For an overview of generative models - which are unsupervised learning techniques that seek to learn the distribution of some data (e.g. words in a corpus or pixels in images of cats) - I highly recommend reading OpenAI's blog post on the topic.
GANs consist of two networks with opposing objectives, seeking an equilibrium in a sort of game being played between them. The "Generator" transforms some input that is sampled from what is called the "latent space" - often times this is a vector with components sampled from some probability distribution - into the output space, which contains what it is that we desire to generate (for example the space of 32x32 RGB images). The "Discriminator" is simply a classifier that receives both outputs from the Generator, and real objects, and then is trained to determine whether the input it is observing is generated or real.
The basic idea is that when both networks are performing optimally, the Generator creates images that are distributed within their respective output space in the same way that real inputs to the Discriminator are.
Some popular adversarial network architectures are:
- Deep Convolutional GANs, that perhaps unsurprisingly are used to generate realistic images.
- Conditional GANs, that learn the distribution of output images given paired inputs for applications such as image-to-image translation
- Cycle-Consistent GANs, which can learn image-to-image mappings without requiring paired inputs.
For a comprehensive set of resources regarding GANs, I recommend Holger Caesar's really-awesome-gan list.
Here's a useful diagram of a Discriminator:
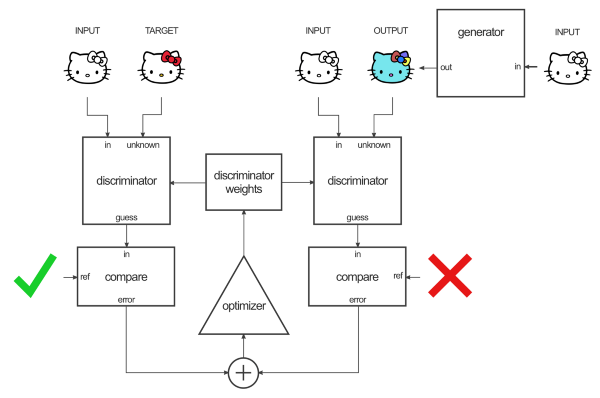
And here's a great diagram overview of a Generator:

Our implementation
We chose to use a conditional GAN, or cGAN, to learn the mapping between male adults shown in body transformation marketing images. A Tensorflow implementation exists that very faithfully ports the code the authors of the cGAN paper wrote in Torch.
I've always liked the quote by Benedict Evans of A16Z that:
A really big computer is a time machine.
However, he was likely referring to loftier aims than training an existing deep learning architecture during a time-crunched 48-hour hackathon.
There is no doubt that without GPU computing power, my team would not have had any results to show during our limited time at the hackathon. Since my own hardworking CPU could only process images at about 1 per every 5 seconds, we had to look to the cloud for solutions.
I opted to use FloydHub to train and store the adjusted weights of my network over AWS EC2 or Google Cloud for a number of reasons:
- The process of "mounting" data with just a handful of simple shell commands, without having to deal with FTP, was easy and intuitive on FloydHub
- Logs were always readily and immediately available with the
floyd-clicommand-line tool or the FloydHub web dashboard, without having to request or download them - Community and support - I was confident that I could find help within the FloydHub community forum in a short time-span if I encountered issues
- Pricing was competitive
Deeper dive
Running the Tensorflow implementation of pix2pix on FloydHub did require some minor tweaks to the code, which I'll detail here in the hopes that anyone trying a similar project in the future might be saved some time.
A typical training command to spin up a FloydHub cloud GPU training server would look like the following:
floyd run --gpu --data rayheberer/datasets/dreamfit/4:/dreamfit_data 'python pix2pix.py --mode train --output_dir /output --max_epochs 200 --input_dir /dreamfit_data --which_direction AtoB
- The
--data path:/dirmounts a FloydHub dataset to the job and makes it available at/dir - Saved outputs, such as model checkpoints, must always stored in
/output(this is an important detail)
Christopher Hesse’s pix2pix implementation was made in Tensorflow 1.0.0, which means that the now-available save_relative_paths option for tf.train.saver was not yet implemented (check out this fascinating GitHub issue if you're interested in learning a bit about the development history of Tensorflow).
Also, you should be aware that, instead of restoring from a single .ckpt file, the model saves a number of files to the output directory specified during training, which can be then chosen as a checkpoint directory during testing or exporting.

Why does this become an issue? Well, because in lines 625 and 725 of pix2pix.py, the argument to the saver is recovered using tf.train.latest_checkpoint(a.checkpoint), which will yield an absolute path of /output on FloydHub.
Because the checkpoint directory of one job on FloydHub can't be mounted to /output in a subsequent job - as that directory will be reserved - an error will be thrown when attempting to restore the model.
The workaround fix is incredibly simple. For a more involved project, I recommend adding an additional parameter that can be set in a command, but for a weekend hackathon, you can simply change lines 625 and 725 of pix2pix.py:
For example, if I were to test or export a model named model-99200, just replace the instances of checkpoint = tf.train.latest_checkpoint(a.checkpoint) with checkpoint = r'/model/model-99200' and then make sure to mount the data on FloydHub.
Now you should be able to test the trained model using:
floyd run --gpu --data rayheberer/projects/burda-gan/6/output:/model 'python pix2pix.py --mode test --output_dir /output --input_dir test --checkpoint /model'
Note the values passed into the --data and --checkpoint parameters.
Another quick workaround without any code changes would be to pre-populate the output directory with pre-trained checkpoints before running the inference:
floyd run --gpu --data rayheberer/projects/burda-gan/6/output:/model 'cp /model/* /output; python pix2pix.py --mode test --output_dir /output --input_dir test --checkpoint /model'
Visualizing our results
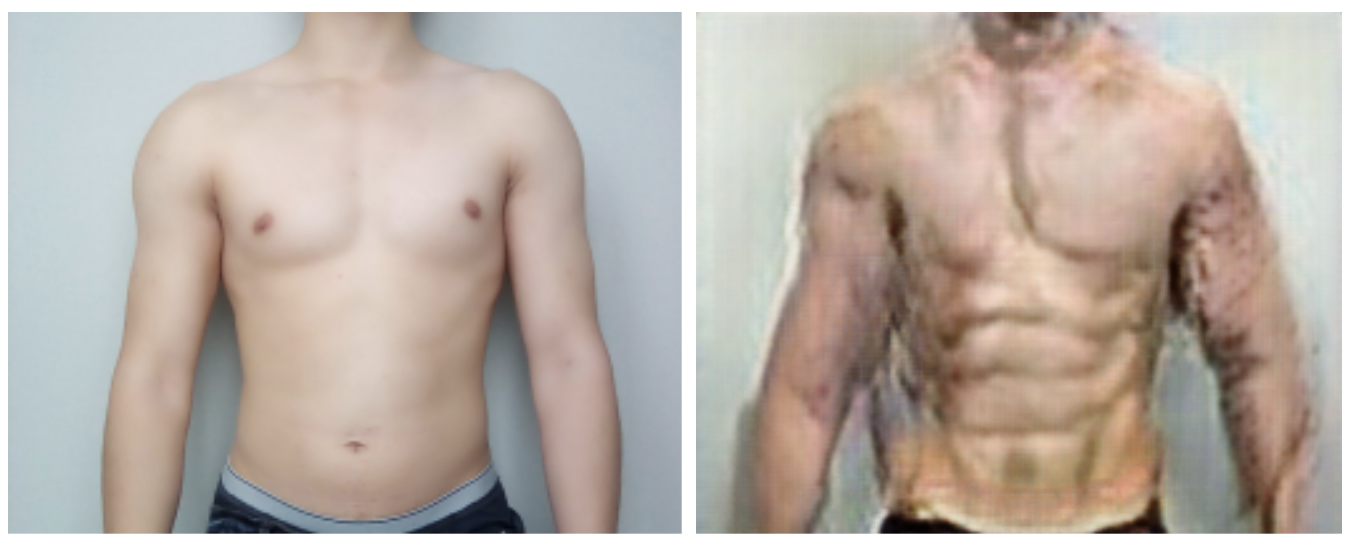
How successful were we in learning the mapping between pre/post body transformation images in males? I'll let you take a look first:
Yikes. Not exactly realistic-looking results. But given that we had less than 150 training images, these results might not actually be that bad!
During the hackathon, I employed two standard forms of data augmentation: (1) random cropping and (2) horizontal reflections. We did also pair reflected pre- images with unreflected post- images, and vice versa - but we did not have time to test whether this improved generalization over only pairing reflected and non-reflected images with each other. That's something for a future project.
Data augmentation clearly improved our results - here are some more generated images using the model trained with augmented data (bottom row) and without augmented data (top row):
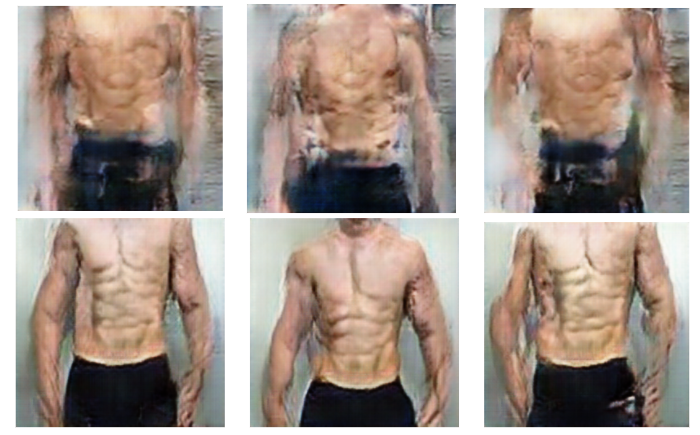
Keep in mind that training the models overnight during the hackathon may not have been enough time for them to fully converge, but the results were fascinating - and sorta gross.
So you see, our results were interesting, but not ready for prime time just yet. However, I consider these low-fi generated images to be a decent proof-of-concept that GANs can have commercial applications given larger datasets to work with.
Advice for prototyping with deep learning
I'd like to leave with a couple parting thoughts to my fellow AI and Machine Learning Engineers who might find themselves on a team making a prototype with very limited time:
-
Be a leader. Two days is not enough time to do your job well as an engineer, since training ML models is an iterative and often very empirical process. Embrace the role of the "expert" by finding novel ways to apply new techniques and knowing where to look to find existing solutions, and don't be discouraged if you don't do anything technically groundbreaking yourself
-
Be honest, but don't be afraid to be unscientific. Prototypes are, in many ways, facades. For a demo, sometimes the best results must be cherry-picked, and this is expected. When communicating and pitching an idea, there may not be enough time to qualify every statement you make or backpedal on something you said that wasn't strictly true. Everyone has a point where they can be maximally-effective while presenting, without losing their integrity. Find yours.
If you're interested in seeing me apply these two principles in my first-ever pitch, skip to 1:36:00 on the recorded live session. Please, be lenient with me.

About Ray Heberer
After failing to complete an undergraduate degree in physics at both the University of Notre Dame and McGill University - followed by a brief stint as a street musician - Ray Heberer has high hopes that artificial intelligence will be the subject that finally holds his interest. Currently, he is the AI Engineer on a diverse team working to develop a corporate car-sharing solution as part of UnternehmerTUM's Digital Product School.
Follow Ray's journey on Medium, or reach out to him on LinkedIn.
We're always looking for more guests to write interesting blog posts about deep learning. Let us know on Twitter if you're interested.