DeOldify: Colorizing and Restoring Old Images and Videos with Deep Learning
Jason Antic's DeOldify deep learning project not only colorizes images but also restores them with stunning results. Learn more about his approach in this FloydHub #humansofml interview.

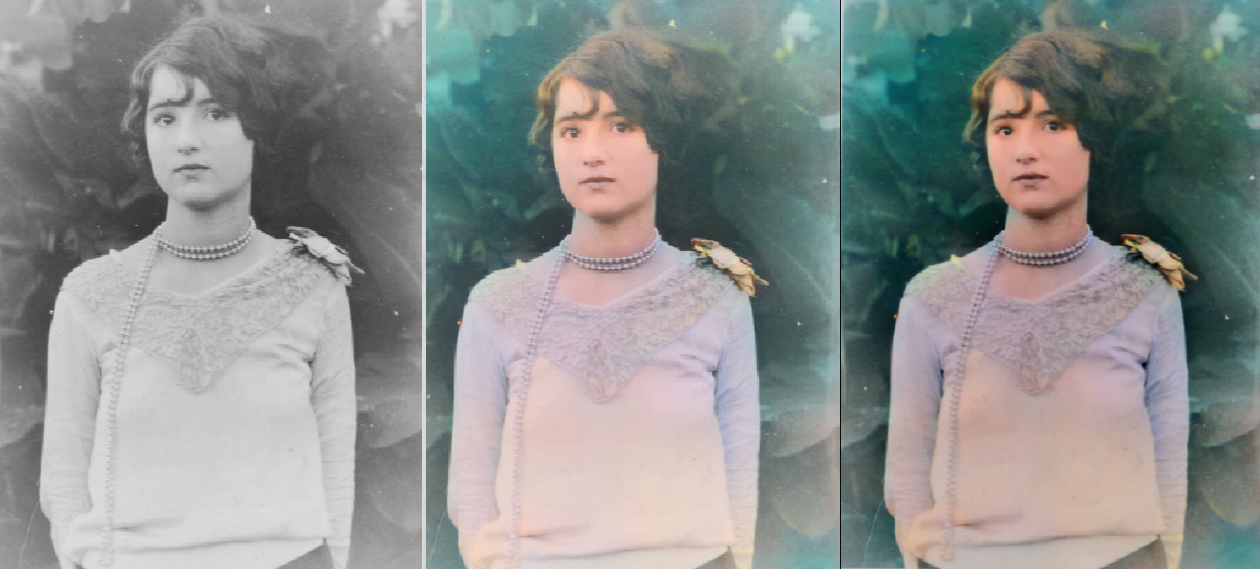
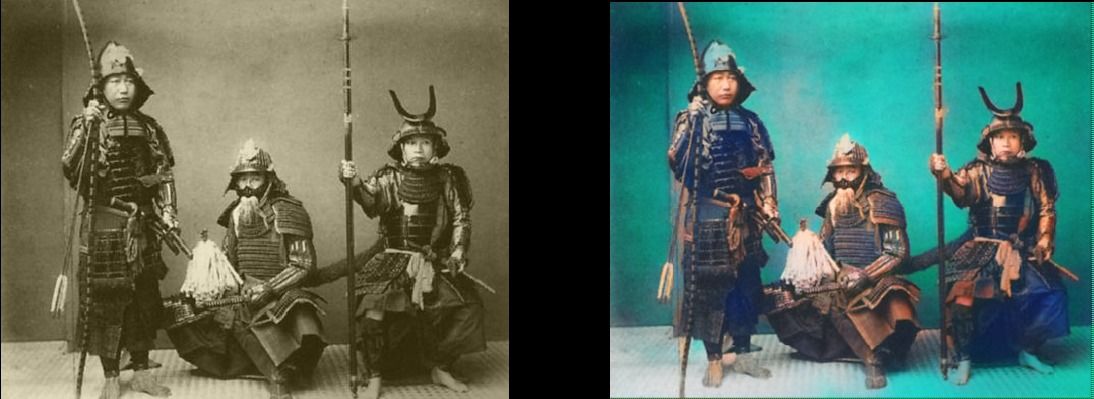
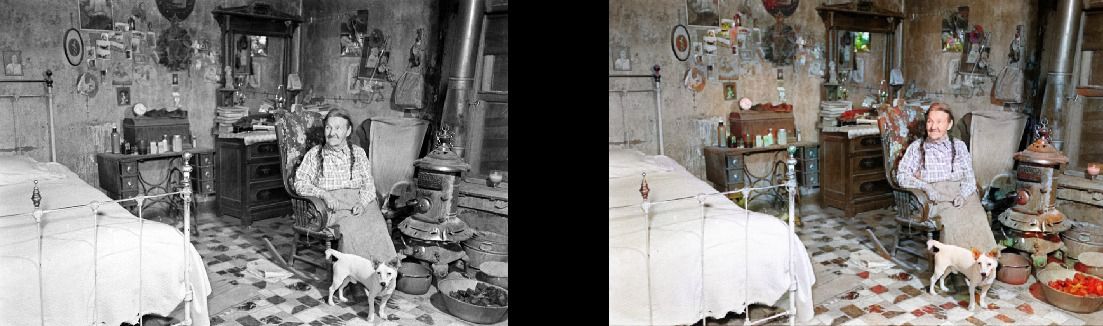
Colorizing black and white images with deep learning has become an impressive showcase for the real-world application of neural networks in our lives.
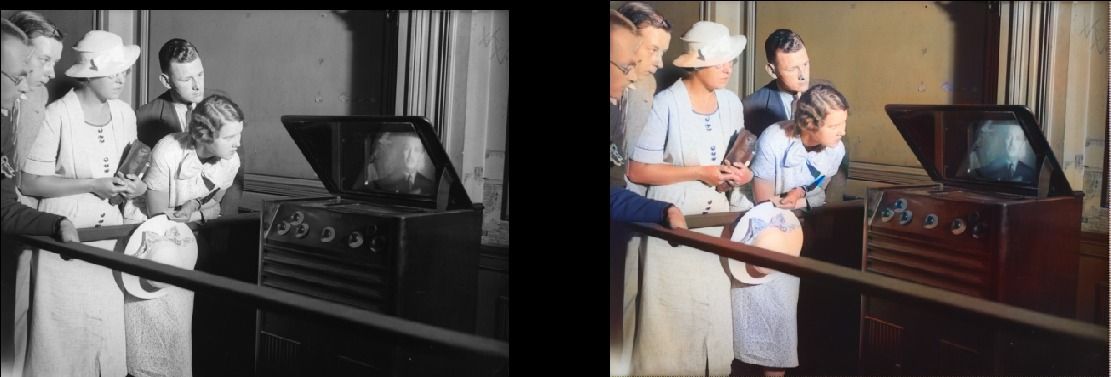
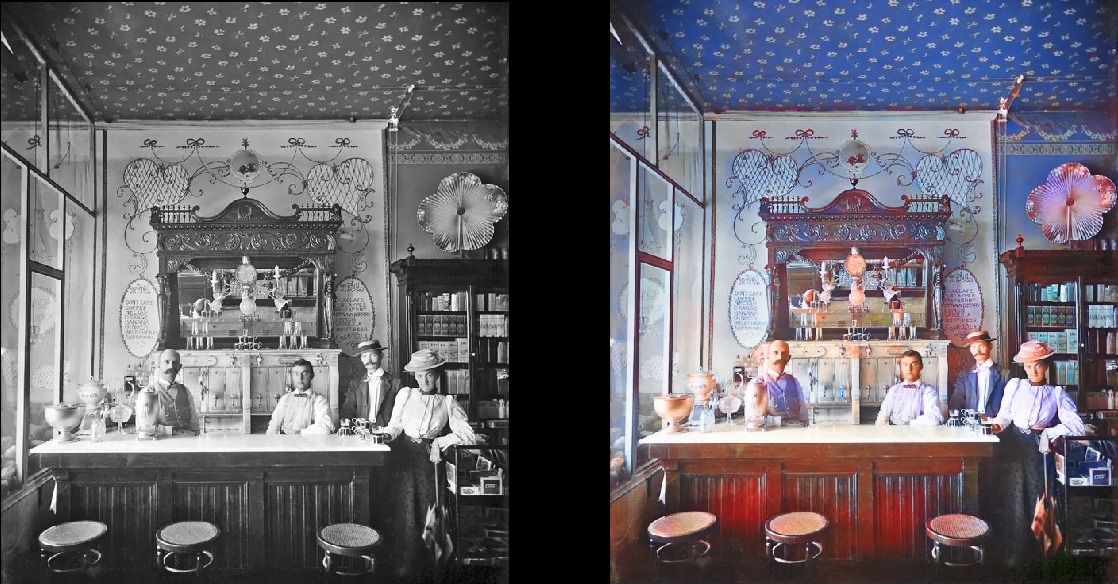
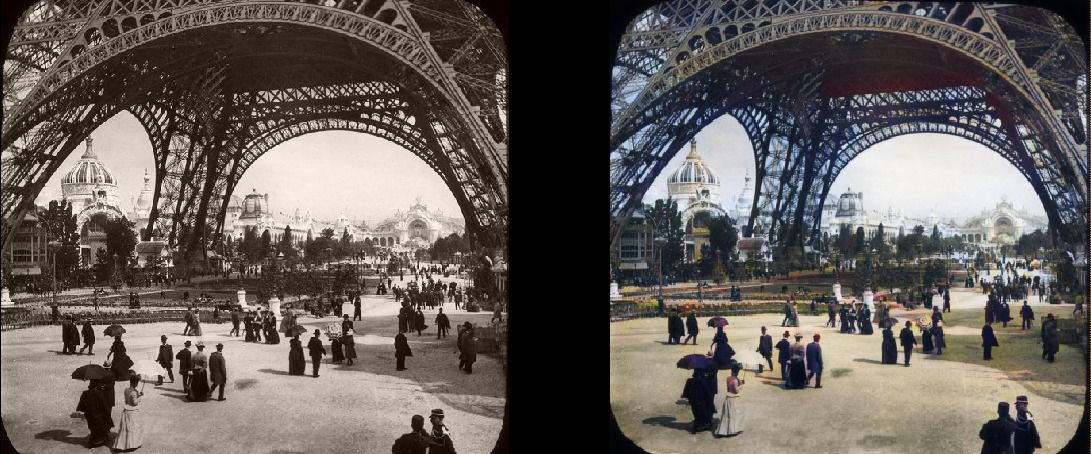
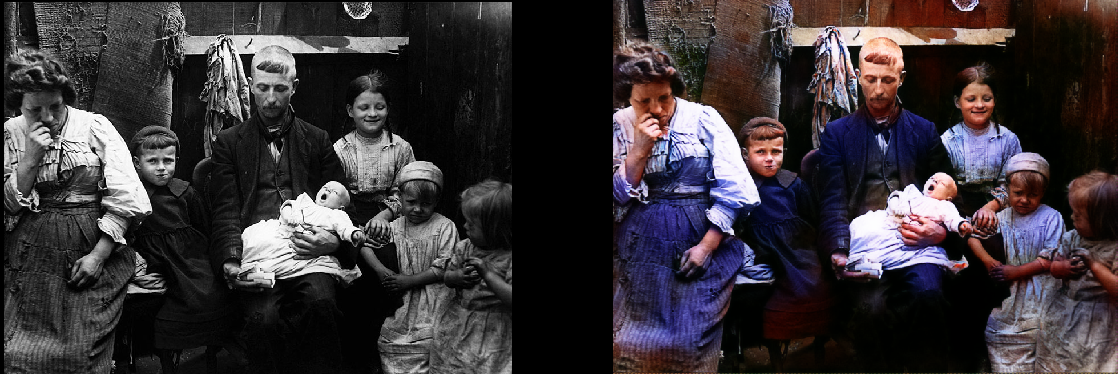
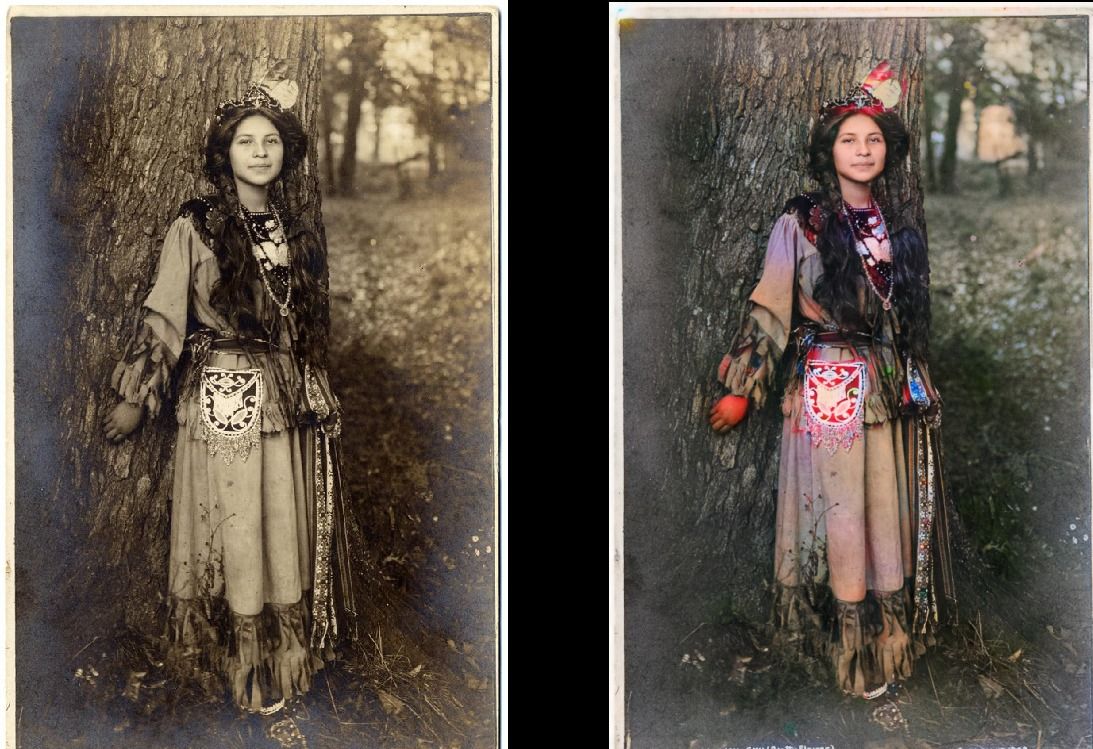
Jason Antic decided to push the state-of-the-art in colorization with neural networks a step further. His recent DeOldify deep learning project not only colorizes images but also restores them, with stunning results:
You can get impressive results on video as well (he developed a new technique called NoGAN to raise the bar on movie colorization):
Jason is a software engineer at Arrowhead General Insurance Agency, where he focuses on automation and quality assurance across the tech stack. Prior to his work at Arrowhead, Jason was a weather forecaster for the Pennsylvania Air National Guard.
Needless to say, I was psyched to chat with Jason for this Humans of Machine Learning (#humansofml) interview. In this post, we’re going to dig into how exactly the DeOldify GAN works, Jason’s plans for continued development of DeOldify, and his own path towards learning data science and deep learning.
Motivation behind DeOldify
First of all, have you ever restored a photo manually? Or with Photoshop?
I have never restored a photo before this project. My experience with Photoshop is basically a little cropping here and there, and randomly adding effects – like how a kid mixes all the sodas together. I’m not a sophisticated user, at all.
I had to do it with Photoshop in high school photography class. It was absolutely painstaking, but oddly satisfying at the same time. Did you have any special photos from your family or elsewhere that you wanted to restore?
Oh sure I do! When my wife and I go back to Pennsylvania for Christmas this year, we’re going to dig through photos to colorize and restore. And we’re not alone in wanting to do this – I keep getting contacted by people discovering my project online, saying that they want to restore and colorize old photos they have, of family, in particular. I suspected this would be the case, but the response has been rather extraordinary on this.
So, where did you come up with the idea for DeOldify?
For a while, even before I got heavily into deep learning, I thought the whole concept of automatically colorizing old black and white photos was just a cool idea. But it never seemed to be done very well, even with the existing deep learning models. As I was taking the fast.ai course on GANs (Generative Adversarial Networks) during the summer, I had a key realization:
The reason why black and white to color (and other deep learning applications) didn’t work as well as they could was because there was still a human involved in hand-coding a key step: Evaluating whether or not the generated image “looked good.” A.K.A the “loss function.”
The most immediately obvious (and wrong!) way to evaluate if the neural network creates a good image is by comparing pixels directly and penalizing according to how different they are. This just encourages the neural network be very conservative in its predictions: Green for grass/trees (that’s easy!), blue for skies (easy!), skin for...skin (easy!)....and then brownish for everything else it just doesn’t know for sure. Brown is numerically a very average color so it’s a good bet if your network is encouraged to just minimize deviations from expected pixel values.
This is what that dullness looks like:
There are clever methods I’ve seen that try to mitigate this by encouraging the network to get a bit more adventurous in color predictions. But it still comes across as quite hacky to me to do it this way.
In contrast, GANs effectively replace those hand coded loss function with a network – the critic/discriminator – that learns all this stuff for you, and learns it well. So it just seemed like a no-brainer to go the GAN route to solve the problem of realistic colorization!
What’s the difference between colorization and restoration?
I do feel a little funny now about how I just went ahead and used the two terms in my project description without being careful about definitions first. But simply put, colorization in my mind for this project is strictly just taking the photos from monochrome to a believable coloring, regardless of the flaws of the image like fading and whatnot. Neural nets are fabulous in dealing with bad/incomplete data, which is why color can be added successfully even if the photos are in bad shape. Note that I say “believable coloring” because colorization is an “unconstrained” problem. That is to say, there’s no one right color for a lot of things (like clothes, for example). Thus I think you could call colorization an “art,” and that’s probably why it’s so hard to get a neural network to do it well.

Restoration, for the purposes of this project, would be taking the further step of trying to believably replace details where they’re missing/damaged. To me, the most common problem I see with old photos is that they’re faded, so my first ambition is to have another neural network “undo” that fade. This would also be a bit of an “art” on the neural networks part, however, because again it’s a bit of an unconstrained problem – who knows what was there when you can’t see it!

On both counts of colorization and restoration, I think the job is done when a person looks at the resulting image and either can’t tell that the image was processed in the first place, or if they experience pleasure just looking at it! I really do consider this an art.
Are those two separate processes in your model, or do they happen at the same time?
It’s two separate processes now. I tried combining them originally, but it turned out to be harder to train and it just didn’t work as well. That’s been a recurring theme actually with this project – that separating distinct functionalities with training/modeling seems to just be more effective. For example, this is counterintuitive but I wound up getting much better results when I stopped trying to get the critic to evaluate everything at once. Separating this problem into two distinct parts, 1. “Does the image have features of the original grayscale” (perceptual loss) and 2. “Does this image look realistic” (critic loss) worked much better.
Technical Overview of DeOldify
How exactly does DeOldify work?
1. Big Data!
2. ???
3. Profit!
I kid, I kid! So, you have two models here: Generator and Critic.
The Generator is what is commonly called a U-Net. To elaborate on what a U-Net is – it’s basically two halves: One that does visual recognition, and the other that outputs an image based on the visual recognition features.
In this case, the U-Net I’m using is a Resnet34 pretrained on ImageNet. That is, when it’s initially constructed, the U-Net immediately benefits from having the ability to recognize objects in images. The other half of this generator looks at what the backbone recognizes and then based on that, determines what colors to use, ultimately outputting all this to a color image. The objective in training the generator in this case is to make this color image a mirror of the input grayscale image, except it has color.
The Critic is a very simple convolutional network based on the critic/discriminator from DC-GAN, but modified quite a bit. Some of the modifications are that batchnorm is removed, and the output layer is a convolution instead of a linear layer. It’s big (wide), yet simple. It just learns to take input images, and assign a single score to them for how realistic they look.
The key magic ingredient here though was adapting a few new tricks from the Self-Attention GAN paper to these models. Basically all I did was put the new “attention” layer that they proposed in both the critic and the generator, and the spectral normalization to both as well. I also used their hinge loss and different learning rates (Two Time-Scale Update Rule) for critic versus generator. But this really made the training a lot more stable. Additionally, the attention layers really made a big difference in terms of consistency of coloration, and general quality.
On top of that, I modified the training regime to start at small 64x64 images, and to progress from there gradually – 96x96, 128x128, 196x196, and 256x256. This was actually in response to real problems I was seeing trying to train the model on just one size – the colorization of real photos either just didn’t look as good, or it would glitch out entirely and look nothing like the original photo. So I introduced the progressive sizing training regime, inspired by the Progressive Growing of GANs paper. But the big difference here is that I’m not adding layers gradually as training image size increases – I just tune learning rates as the transitions to larger sizes happen such that the transitions don’t blow up, and the model eventually learns how to effectively deal with the larger size.
Now, let’s try same question, but as a Reddit-style ELI5 “Explain Like I’m Five.”
Challenge accepted! So there’s two things that work to make the images – a generator and a critic. The generator knows how to recognize things in images and so it can take a look at a black and white image and figure out what most coloring should be used for most of the things in the image. If it doesn’t know, it tries its best to pick a color that makes sense. It’s trying its best to make the image look real, because then the critic will take a look and try to figure out if it’s real or not. The generator is constantly trying to fool the critic into believing that the images it makes are real. So it has to be creative – clothes can’t all be brown, for example! Otherwise, the critic will quickly figure out that the images created with all brown clothes are fake, and the generator will have failed to fool the critic. The generator and critic keep getting better from this back and forth with each other, and therefore the images get better and better.
What exactly is a Generative Adversarial Network?
I think the best definition I’ve heard is that it’s two models – a generator and a critic/discriminator. They’re placed in competition with each other such that the generator is constantly trying to fool the critic, and the critic is constantly trying to not be fooled. You wind up getting really good results on things like image generation in this setup because of this competitive (adversarial) dynamic.
Why did you use a GAN for this project?
It was a simple intuition: GANs are effectively learning the loss function for you. Progress in machine learning seems to make huge leaps when you replace hand coding with learning by the machine. For example, image recognition took a huge leap a few years ago when features were coded to be learned from the bottom up instead of being designed by hand.
I had noticed early on in studying deep learning that we were still hand coding the loss function. This just seemed like an obviously bad idea! So I just concluded – let’s replace the hand coded loss function with a GAN. This idea in my head wasn’t just for this colorization work: It’s really something I think will probably guide future efforts on other things as well. It just makes sense. In the case of colorization, it wasn’t a huge leap conceptually to go from noise-to-image generation (most existing GANs), to image-to-image generation, so that helped. But I really do think this whole general idea of having the machine learn the loss function really is powerful and important.
What were the biggest challenges you faced in developing this project?
Honestly, me (LOL) – The battle inside my head and and keeping myself on track. I wasn’t very disciplined in how I approached the project, mostly because I was just so excited about it. I was constantly in the uncanny valley of “it’s almost working!” for about two months. And so I just kept turning knobs (probably repeating myself) hoping that “this is it!” I think I ran about 1000 experiments, believe it or not. I really made a lot of dumb mistakes simply because I wasn’t careful and shot myself in the foot with having to do extra debugging because of it.
For fun, I’ll illustrate some of the many silly mistakes I made, in pictures!
First, I didn’t take the time to visualize my training pictures (after augmentation). So when I saw the weird blurring going on below, I really had no clue at first that it was because I was rotating the pictures and losing details as a result – basically telling the network to make the photos worse. Before I figured this out, I was making theories about how the generator model was somehow not working quite right. That was silly! After I set up TensorBoard, things went a lot more smoothly in this regard.
Second, I forgot to run eval() mode when generating visualizations at first, resulting in weirdly saturated pictures. It took me a bit longer to figure this out than I’d like to admit….
Third – I don’t have a picture of this unfortunately, but for quite a while early on in the project I was baffled when I was getting some generated images that would mirror each side, down the middle. Not always. Sometimes. It was really bizarre looking. I turns out I was feeding in source images that were one way, yet half the time the target color image would be augmented to be flipped horizontally. The neural network decided that the best solution to this was to show each side on both sides (just try to imagine that!)
So basically, the big lesson here was that I need to bring back the software engineering discipline I’m usually so accustomed to – have rapid feedback, make only small changes at once, read your code carefully, and test before moving on to new changes. I didn’t do any of these things at first because I was just so excited and impatient. That was not smart.
I also really had to battle the whole “imposter syndrome” thing where I have this running dialog in my head going more or less like this:
“Dude, you just finished the fast.ai courses a month ago and this is your first project. You really think you’re going to make something this ambitious work? You’re clearly deluded.”
After a few weeks of failures, it’s really easy to start believing that. Even after I finally succeeded, it took me a while to accept that “Oh yeah...I actually really did do something significant here!”
Recalling the above is a bit amusing to me because first of all at my day job one of my biggest “things” is being disciplined about development (testing, code review, etc). And I am the one who winds up talking sense into mentees at work over the whole issue of “imposter syndrome.” But this all went out the window with this project. It was a really good experience for self-rediscovery!
Let’s dig into the data behind your project, which is often the most challenging part of a deep learning project. What can you tell us more about that process?
Oh man...I hate to admit it but I didn’t actually have to think too hard about that part in this case! The first dataset that came to mind was ImageNet and….it just worked. It sprung to mind because it’s huge and very diverse (1000 categories). That’s basically what I needed here to get good training on how to colorize.
Now, I did at one point try to add Google’s Open Images dataset which is really huge and really diverse. But it really didn’t seem to make much of a difference, and I also realized later it actually had some black and white photos, which didn’t help. So I scrapped that.
How do you actually know if the colors are anywhere close to real-life? It seems like DeOldify could decide to paint an old picture of The White House a nice light turquoise. Does that matter?
To me, it only matters if it bothers you as a viewer of the end result. I actually wouldn’t expect the White House to go light turquoise because that’s just not in the palette of buildings, generally speaking, and the model definitely seems to be picking up on what colors are “reasonable” for a given type of object. Now, what bothers me and bothers a lot of people is that the model definitely has a bias towards blue clothing. Not all clothing gets colored this way by the model – but it’s definitely a strange bias. That matters to me because it makes the results less believable.
So how do you know if the colors are actually close to real-life? It depends on what you’re talking about, but a lot of things are just inherently “unconstrained” (again, like clothes), so you just don’t know! And I feel that’s ok, because colorization really is an art to me.
Lessons learned and next steps for DeOldify
What were some of the biggest surprises in building DeOldify?
First, what didn’t work well was a surprise to me: I really thought Wasserstein GANs were the way to go (they have nice theoretical properties). But they just were so unstable. I kept getting crazy images such as this:
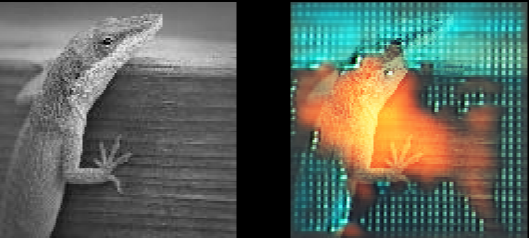
I guess you could call that art, and I do think it’s cool looking, but it’s certainly not what I was looking for!
I wound up struggling with Wasserstein GANs for 6 weeks before finally giving up on them and giving Self-Attention GANs a chance. I quickly implemented that, walked away and entertained family in town, and then woke up the next day to find that it was actually working really well. I didn’t expect just how well it was working, to the point that I was really worried that I must have been looking at the real color images on Tensorboard instead of generated ones. I then confirmed that, actually, yes, the model really was working that well!
One result image in particular stuck out to me though. It was this:
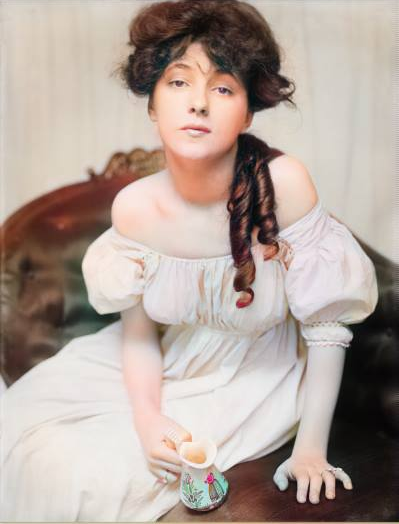
Now you can see that there’s flaws in the picture. The greenish thumb, for example, and the zombie arm that goes with it. But the cup is what got me excited. “Look at how it’s getting the details on that cup!” I was convinced then that I was on to something.
So basically the biggest surprise was that it worked as well as it did. That really wasn’t my ambition here. I thought I’d get better colors and generally more realistic looking images, but the details that are being filled in are astonishing to me.
What’s your vision for DeOldify?
I consider myself incredibly lucky that I connected a few dots and apparently got state-of-the-art automation colorization based on GANs before somebody else did. I’m convinced that was an inevitability- there’s a ton of smart people in the field after all so… yeah… I hit the jackpot of “right place, right time.”
But I think there’s plenty of really cool tech demos out there being produced by a lot of brilliant people, and this is just one of them. And let’s be clear on that – right now, this project is just a cool tech demo. It’s barely practical for even Joe L33t Hacker to get this up and running because the setup is just a big pain in the butt. Plus the hardware requirements are through the roof.
What I really want to do is focus on engineering this cool tech demo into something that is actually practical and useful. That is to say:
- It’s easy to run (not just on Linux)
- Easy to install (or not install at all)
- The hardware requirements are taken down several notches
- The images don’t need to be “artistically selected” to look good
That’s going to take a lot of work! But I think this is really where time will be well spent in deep learning for people like me (software engineers). As opposed to chasing tech demo after tech demo.
You used the fastai library -- how was that? Do you recommend it?
Not only do I wholeheartedly recommend the fast.ai library – I recommend the classes as well. Jeremy Howard and Rachel Thomas are doing a really wonderful job of breaking down the barriers to deep learning. They literally changed my life.
The brilliant thing about the fast.ai library is that it’s made to be dissected and pieced back together to fit exactly the problem you’re trying to solve. It seamlessly works with PyTorch and you can use as little or as much of fast.ai as you want. In the case of this GAN project, the library admittedly was lacking explicit support for a lot things so I had to piece together parts myself. But fast.ai still has a lot of useful reusable parts that I threw in that made life easier and I didn’t have to reinvent them. Not all libraries are like that.
Is your project publicly available for people to reproduce?
It sure is! All of the source code and even the images I’ve been posting as examples can be found here at the Github repository:https://github.com/jantic/DeOldify/blob/master/README.md
Advice for people studying AI
You’re clearly a lifelong learner. What are you hoping to learn or tackle next in your career?
Well it’s kind of funny – I got all this attention for this very first project I did right after my fast.ai classes were completed. It was supposed to be just the first of many projects, covering diverse approaches to deep learning (vision, structured data, natural language processing, etc). And I still want to do that because it does seem there’s a lot of value in the “cross pollination” of ideas in deep learning. For example, Jeremy Howard created state-of-the-art nlp (ULMFiT) by adapting the basic idea of “transfer learning” that was by that time a no-brainer in computer vision. Apparently this wasn’t a no-brainer in nlp before ULMFiT, which is surprising to me. I want to be on the lookout for those sorts of opportunities, and I think adopting a broader view of things encourages those sorts of mental connections.
This is a bit tangential, but I’m also a big believer in the idea that problem solving skills are very learnable and that they can take you much further than just raw intelligence. It’s a big passion of mine. I hope to start distilling these ideas in a blog of some sort.
Any advice for people who want to get started with deep learning?
I think I want to address this from the perspective of a software developer who has been in the field for a few years and is itching for a change. That’s where I was coming from going into this, and I hit a few snags before I feel like I finally got it right.
First of all, it is a big time investment. I originally thought I could do this stuff on the side at night after work, and I had several false starts as a result. You can see this sad history in my Github repo of several forked deep learning courses over the years that went nowhere. In the summer of 2017, I tried taking the first iteration of the fast.ai courses. While I loved it, and was convinced that I should continue doing it (and could do it in the first place!), I was also noticing that I just couldn’t put in the kind of time I needed to put in to really get good at it and not get totally burned out.
I’m going to get on my soapbox a bit, but the fact is that we only have so many hours in the day – yet it seems software culture hasn’t fully embraced this reality as far as expectations go of how you spend your time. We all want everything – be healthy, have friends, be a great employee, be a good husband, be a lifelong learner, etc. But there’s only so many hours in a day.
You can’t have it all. You have to make hard choices and set aside a significant amount of time to do this right.
So in order to make this pursuit of deep learning work for myself, I actually wound up negotiating part time at my day job, and waiting another year (summer of 2018) before I finally took the plunge. But having that extra time made all the difference in my mind. It was why I was comfortable with “wasting” two whole months on a project (lots of hours!!) that ended up honestly being pretty awesome. That slack built into the schedule is what allowed for creativity to run its course, basically.
What resources would you suggest that people check out?
If you’re really looking to get into Deep Learning, I think a few high-quality resources stand out:
- fast.ai (can’t express enough love for this)
- Neural Networks and Deep Learning online book: Full of great intuitive explanations, and a great supplement to fast.ai
- Distill: Once you’re pretty far along with the first two, this site is just a joy to read and interact with. It’s a great initiative and I hope more material is published on it soon.
- FloydHub: super-intuitive platform for getting up-and-running on cloud GPUs, instead of worrying about Docker images, environment set-up, and DevOps
Side-note: I think it’s really important to be picky about your resources – it can make all the difference in learning, motivation, etc.
This was great! Thank you, Jason, for chatting with me. Where can people go to learn more about you and your work?
The DeOldify project is here on GitHub. And I talk about it even more on Twitter.
Also, if you want to learn more about the research behind Deoldify you can watch this presentation hosted at F8:
Thanks for hosting the interview! I really this encourages more people to explore deep learning. I think we’ve only scratched the surface of not only the potential for solving problems but also to unlock new avenues of creativity.