Recognize relatives using deep learning
Building a cousin image classification app using a convolutional neural net for your Thanksgiving family reunion using fast.ai and FloydHub.

I have a lot of cousins. Like 36 or something. And, yes, these are real-deal first-cousins. None of that once-removed or second cousins stuff over here (but we've got plenty of those, too – 👋 Hi, Dolan clan!)
This means that our annual family reunion on the Day After Thanksgiving can be a tad bit intimidating to the newcomer – the fresh-faced new boyfriend or girlfriend, the college roommate from across the country, the hapless co-worker who doesn't realize how deep the rabbit hole really is.
This year, it dawned on me...
I could build a Clabby cousin facial recognition app using a convolutional neural net, and thus end the confusion amongst our cousins once and for all.
Party guests, party crashers, padawans, – you name it – would simply need to snap a photo of the cousin in question, and then my deep learning app would take it from there. In fact, you can try it out right now.
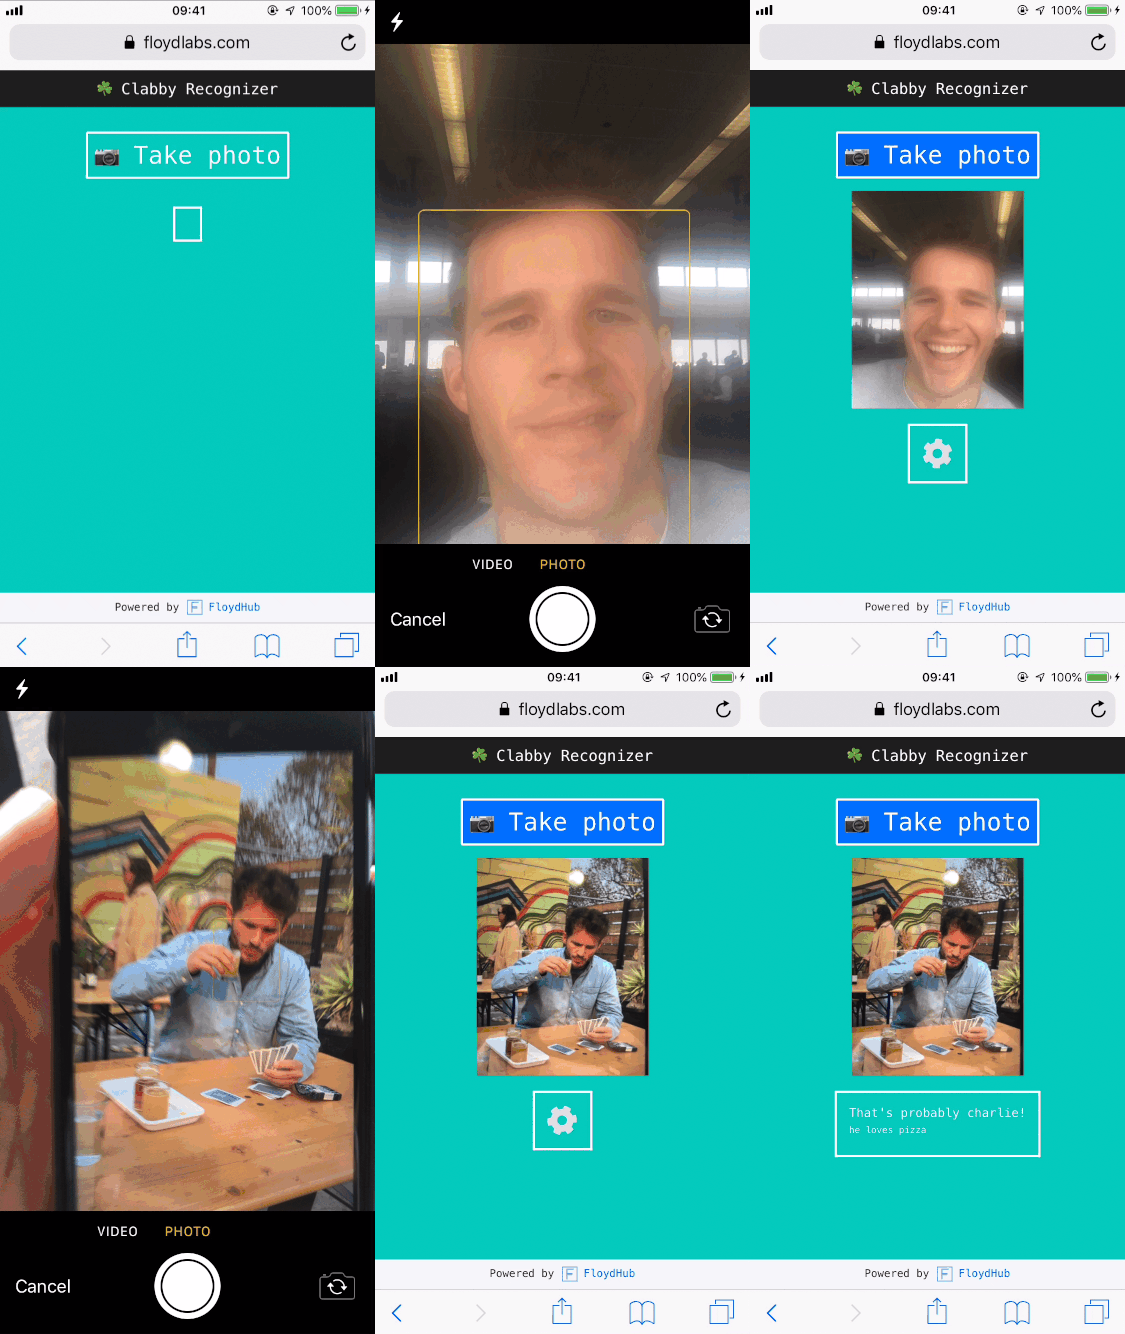
In this post, I'll show you how to build, train, and deploy an image classification model in four steps:
- Creating a labeled dataset
- Using transfer learning to generate an initial classification model using a ResNet-34 architecture and the
fastailibrary - Analyzing and fine-tuning the neural network to improve accuracy to 89%
- Shipping the AI model to production using Flask and FloydHub
If you follow along with this post, you'll be able to build your own world-class convolutional neural network to classify images using PyTorch and the fastai library on FloydHub. And that's pretty darn awesome. Grabbing that labeled data
Like most deep learning projects, our cousin recognition neural net is hungry for labeled data. In our case, I simply went to the source: thefacebook.com.
I wish I could say that I automated this process in some cool, hacker-y technical way, but I didn't. I manually went through Facebook profiles and took little screenshots of each cousin's face from their photo feed. I tried to get roughly 60 photos per cousin, or until I got bored looking at their dumb faces. I also threw myself into the dataset, because — hey, why not? I'm a Clabby cousin, too. I also learned that my cousin Aidan still hasn't accepted my friend request from a few years ago, so he's not included in the dataset.
After about an hour of data scraping, I had gathered my ~60 photos for seven of us cousins, and placed them into properly labeled folders. Here's what my dataset directory structure looked like:
.
├── brian
│   ├── Screen\ Shot\ 2018-10-29\ at\ 6.38.44\ PM.png
│   ├── Screen\ Shot\ 2018-10-29\ at\ 6.38.51\ PM.png
│   ├── ...
├── charlie
│   ├── Screen\ Shot\ 2018-10-29\ at\ 6.48.44\ PM.png
│   ├── Screen\ Shot\ 2018-10-29\ at\ 6.48.51\ PM.png
│   ├── ...
├── jack
│   ├── Screen\ Shot\ 2018-10-29\ at\ 6.58.44\ PM.png
│   ├── Screen\ Shot\ 2018-10-29\ at\ 6.58.51\ PM.png
│   ├── ...
...
Those file names are pretty darn hideous, but don't worry - we can easily clean those up later.
Now, before we dive into our next step of building our model in a Jupyter notebook on FloydHub, I'll upload this folder as new dataset on FloydHub.
Wrangling data can be often challenging when you're using cloud GPU providers, but with FloydHub it's easy to upload and work with large datasets. Once you download the floyd-cli command-line-tool on your local computer, you'll login to FloydHub, create a name for your new dataset, and then initiate the dataset upload:
pip install -U floyd-cli
floyd login
floyd data init cousins
floyd data upload
If all goes according to plan, you'll see something like this in your computer's terminal:
$ floyd data upload
Get number of files to compress... (this could take a few seconds)
Compressing 439 files
Compressing data...
[================================] 439/439 - 00:00:02
Making create request to server...
Initializing upload...
Uploading compressed data. Total upload size: 44.3MiB
[================================] 46433743/46433743 - 00:00:07
Removing compressed data...
Upload finished.
Waiting for server to unpack data.
Waiting for unpack....

NAME
-----------------------
whatrocks/datasets/cousins/1
Awesome – our labeled Clabby cousins are now uploaded to FloydHub. Time to start modeling!
Building the model with transfer learning
Setting up your cloud GPU machine
I'll be building our classification model in a cloud GPU FloydHub workspace, which is a JupyterLab development environment geared up for deep learning. With Workspaces, FloydHub provides several useful features on top of your standard Jupyter notebook workflow, including:
- Machine insights, alerts, and metrics about your cloud machine's GPU, RAM, and CPU usage
- Attaching datasets and pre-trained models to your running Workspace
- Integrated terminal access
Let's create a Workspace for our cousin classifier project. Here are the steps:
- Login to the FloydHub dashboard
- Create a new Project
- Create a new Workspace within that Project
You might notice that when creating a new Workspace that you can either start from a blank state or you can import from a public GitHub repo. In our case, we'll start with a blank Workspace (but – 💡 protip – I often use this start from a repo feature to play with cool new deep learning projects that I discover on GitHub!)
We'll also select the PyTorch-1.0 Docker image as our environment and a CPU machine for our instance type. Don't worry, we'll later toggle our workspace onto a GPU machine, but only when we're ready to train our model. This is a great way to be more efficient and save money with your cloud GPU platform usage.
Click start, and we're live on our deep learning cloud machine!
Using the fastai library
Have I mentioned that we're using the fastai library to build our classification model. I have, haven't I?
That's because I love it. It's a fantastic, approachable library built on top of PyTorch that comes with the latest and greatest deep learning best-practices built-in. You're probably already familiar with François Chollet's Keras layer for TensorFlow – fastai is a similar library for PyTorch.
FloydHub's default PyTorch-1.0 environment includes the fastai library by default, but because the library is updating so rapidly, it's best to upgrade your fastai version whenever you start your Workspace. Just add this to the top of your Jupyter Notebook and run the cell to upgrade fastai:
!pip upgrade fastaiI'll now attach the cousins dataset to this Workspace. After a quick search in the right hand panel, I've found my uploaded dataset and it's been mounted to the /floyd/input/cousins directory.
I have to do one additional step here due to the nature of the way the fastai library deals with datasets. Normally, it's fine to keep your datasets in a read-only directory. In fact, FloydHub does this on purpose in order to help you ensure reproducibility for your model training jobs. But the fastai library assumes that your machine can write to your dataset's directory, so I'll open up a terminal in my Workspace, create a new data directory within my main /floyd/home directory, and copy over the labeled images.
$ pwd
/floyd/home
$ mkdir data
$ cp -r /floyd/input/cousins /floyd/home/data
Another tip - you can also do all this from your Jupyter notebook (just prepend any shell commands with ! in your notebook, like this !pwd).
Next, let's do that file name cleanup I mentioned.
# location of our dataset
path = Path('/floyd/home/data')

# name cleanup
import os
for folder in path.ls():
    i = 1
    label = str(folder).split('/')[-1]
    if label != 'models':
        for photo in folder.ls():
            new_name = f'{str(folder)}/{label}_{i}.png'
            os.rename(photo, new_name)
            i = i + 1
Now my files should look like this:
.
├── brian
│   ├── brian_1.png
│   ├── brian_2.png
│   ├── ...
├── charlie
│   ├── charlie_1.png
│   ├── charlie_2.png
│   ├── ...
...
I also need to get a list of my "labels" – which is just a fancy word for the name of the cousin that my neural network will be guessing based on a given input picture.
fnames = sorted(path).glob('**/*.png'))
print(names)
['brian', 'charlie', ... ']
Meet the DataBunch
Now that my pre-processing is done, I'll next package up my dataset into a DataBunch object.
A DataBunch is an object that contains your training data, validation data, and handles any data transformations or augmentation. It's a super convenient way to prepare your dataset for training, and it's probably one of the nicest out-of-the-box features of the fastai library.
In our case, I'll be using the ImageDataBunch subclass that provides a factory method to construct a DataBunch using regular expressions to identify photo labels.
# create a regex to grab the label from the filename
# e.g. /foo/bar/labelname_01.png -> labelname
pat = r'([^/]+)_\d+.png'

# create the DataBunch
data = (ImageDataBunch
        .from_name_re(path,
                      fnames,
                      pat,
                      ds_tfms=get_transforms(),
                      size=224,
                      bs=64)
	.normalize(imagenet_stats))
Now that we have our dataset packaged into a DataBunch, we can easily explore it:
data.show_batch(rows=4, figsize=10,8))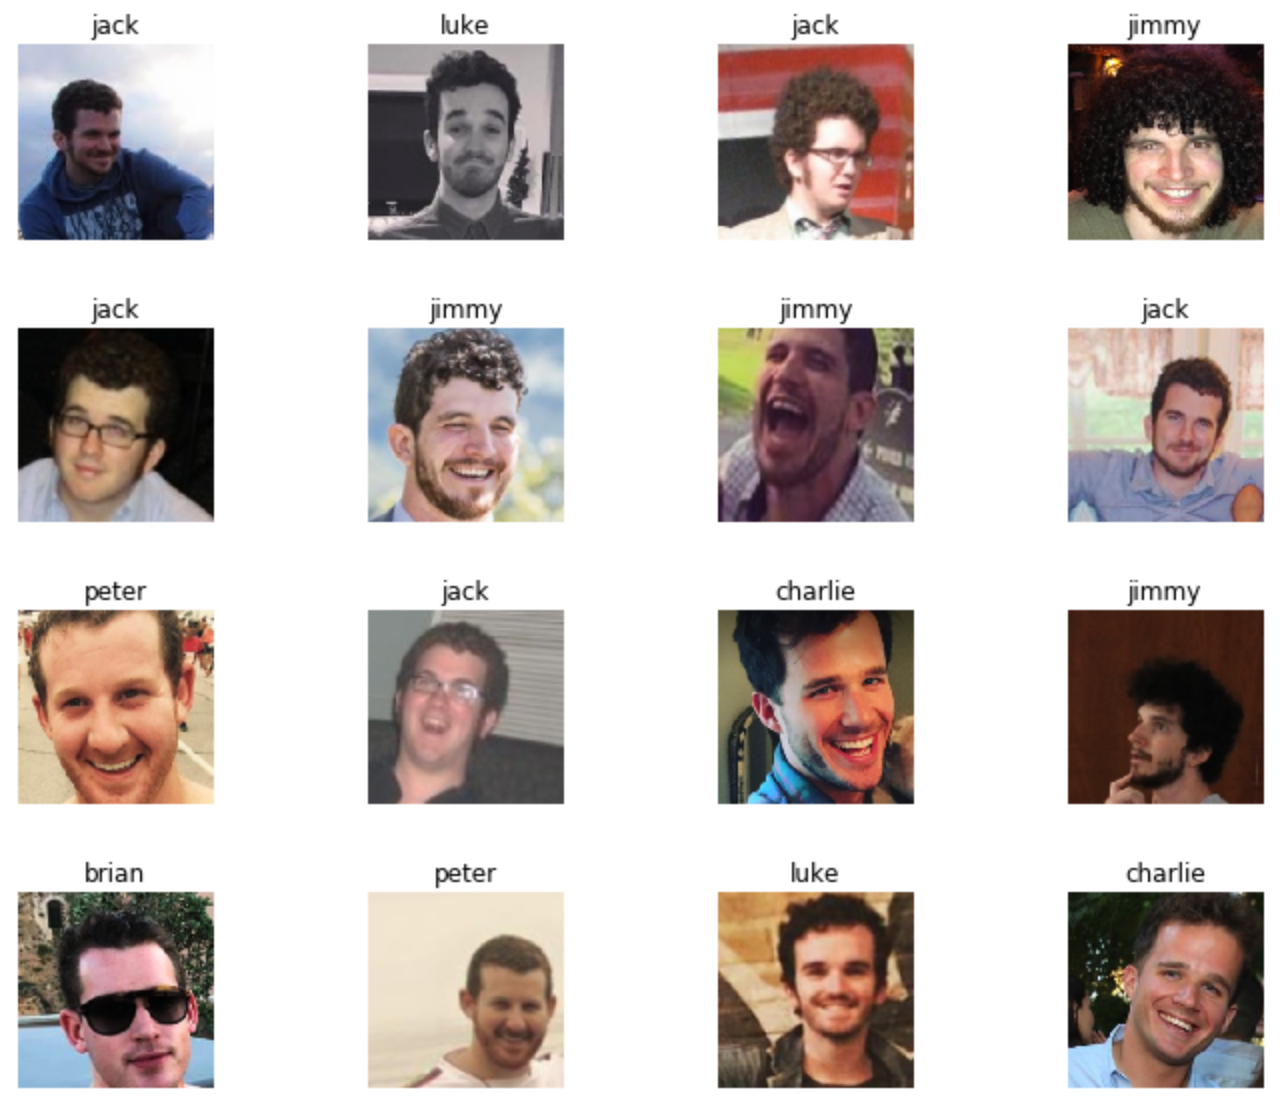
That looks pretty solid. I recognize those gentlemen. Let's start the training.
Learner
Since we're about to start training our model, let's switch our Workspace to a GPU machine. You can tap the restart button in the top nav bar of your Workspace, and then set your Machine type to GPU:
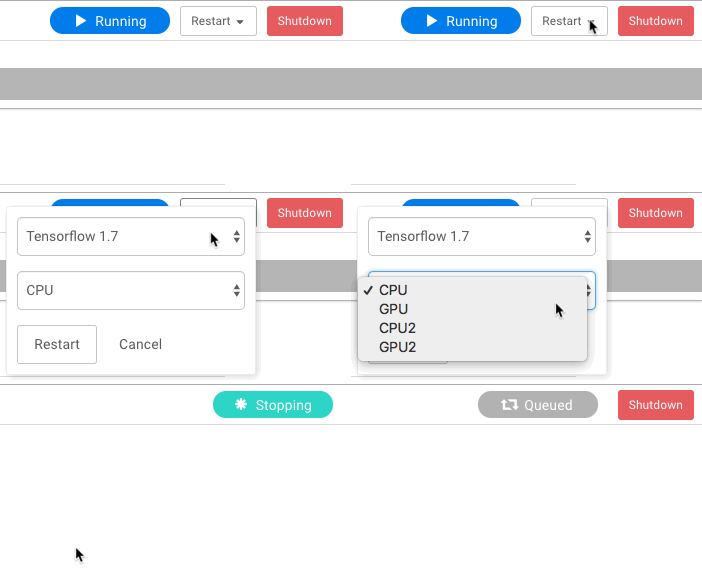
Now that we're in a GPU-powered workspace, we can start building our classification model. Luckily, we don't need to start from scratch. We'll be using transfer learning to augment a model that's already been trained on a large image dataset. This is nearly always preferable (and faster) when compared to starting from a clean slate.
fastai provides a number of pre-trained model architectures, and we'll be using ResNet-34, which has been trained on more than 1 million ImageNet images. It's insanely easy to initiate a transfer learning model with fastai. We'll use the create_cnn function, and then pass in our DataBunch, choose our model architecture, and specific any metrics we want to track (we'll use error_rate in our case).
fastai will download the pre-trained model, and replace the head of the model with two new layers that will be dedicated to our specific classification task. As you might expect, the size of final layer will match our number of labels in our DataBunch, so that we can make predictions. We'll train our two new layers for 4 epochs, using the one-cycle approach (popularized by Leslie Smith) to gradually decrease the learning rate during each epoch. This tends to yield significantly better results. Finally, we'll save our model so that we can reference it later.
learn = create_cnn(data, models.resnet34, metrics=error_rate)

learn.fit_one_cycle(4)

learn.save('clabby-stage-1')
Interpreter
Now that we've got our baseline model, let's dig in and see how well it performs. fastai provides an interpretation class for classification tasks that makes anyone seem like an amazing data scientist.
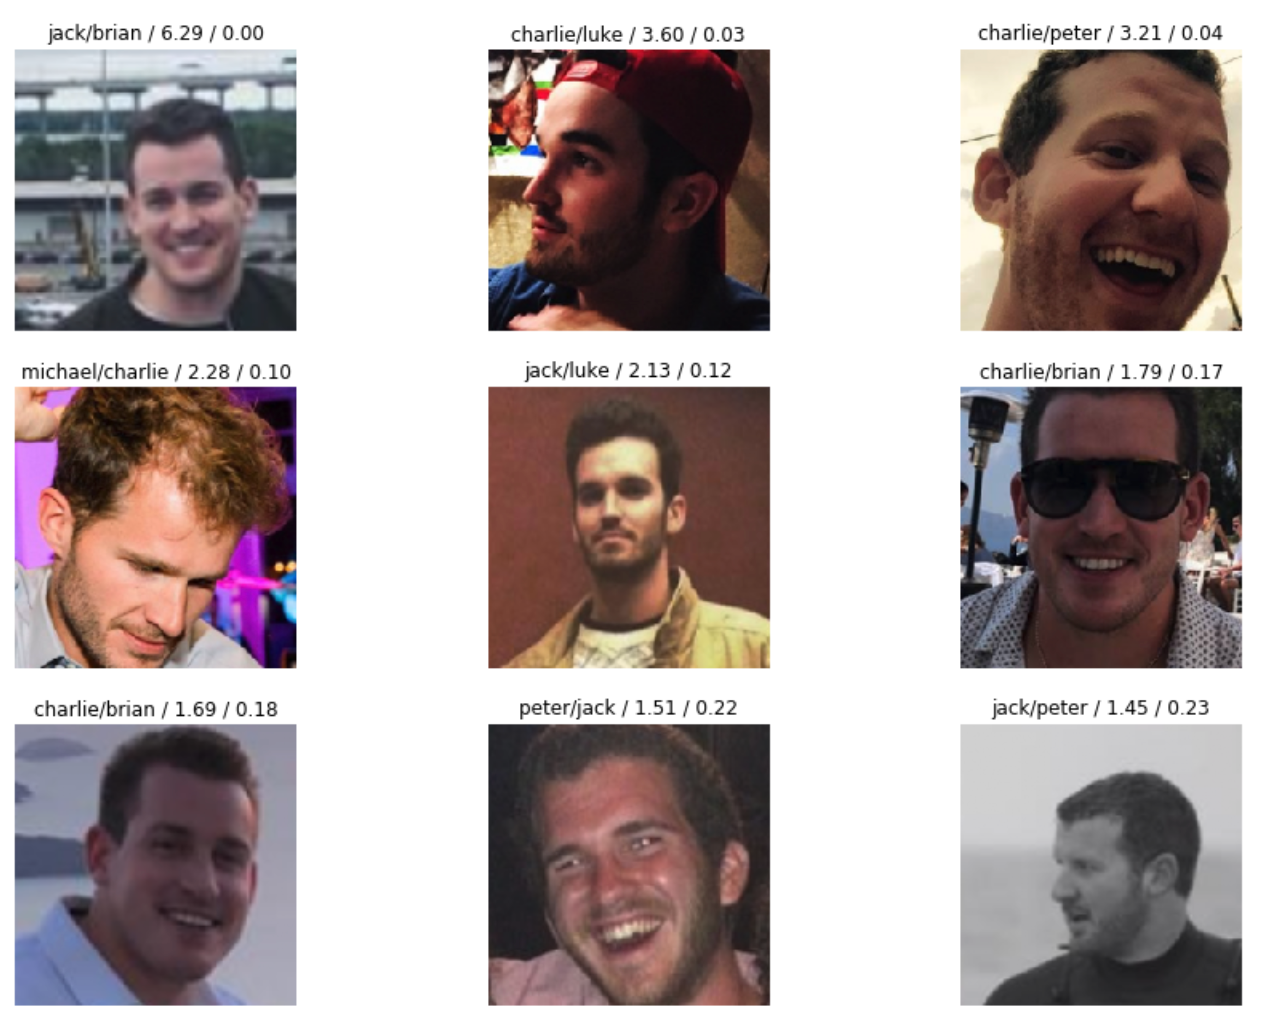
I'll first take a look at the photos in the validation set where my baseline model was totally wrong.
interp = ClassificationInterpretation.from_learner(learn)

interp.plot_top_losses(9, figsize=(15, 11))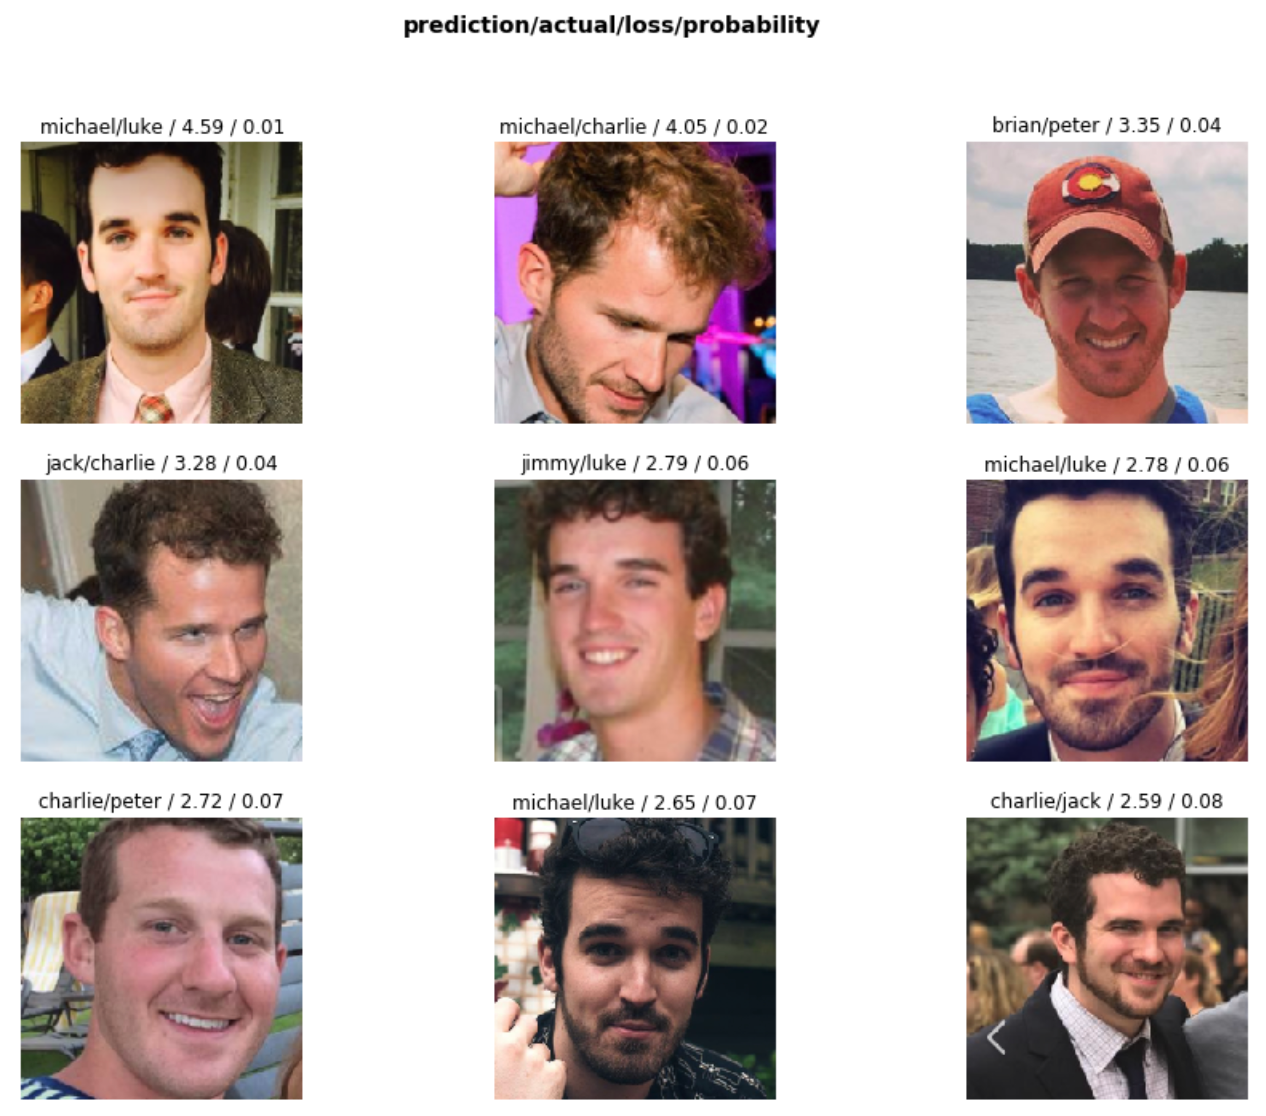
It's clear that our model was both extremely confident and extremely wrong for several of the photos in the validation set. Let's dive a bit deeper, using a confusion matrix:
interp.plot_confusion_matrix(figsize=(12, 12), dpi=60)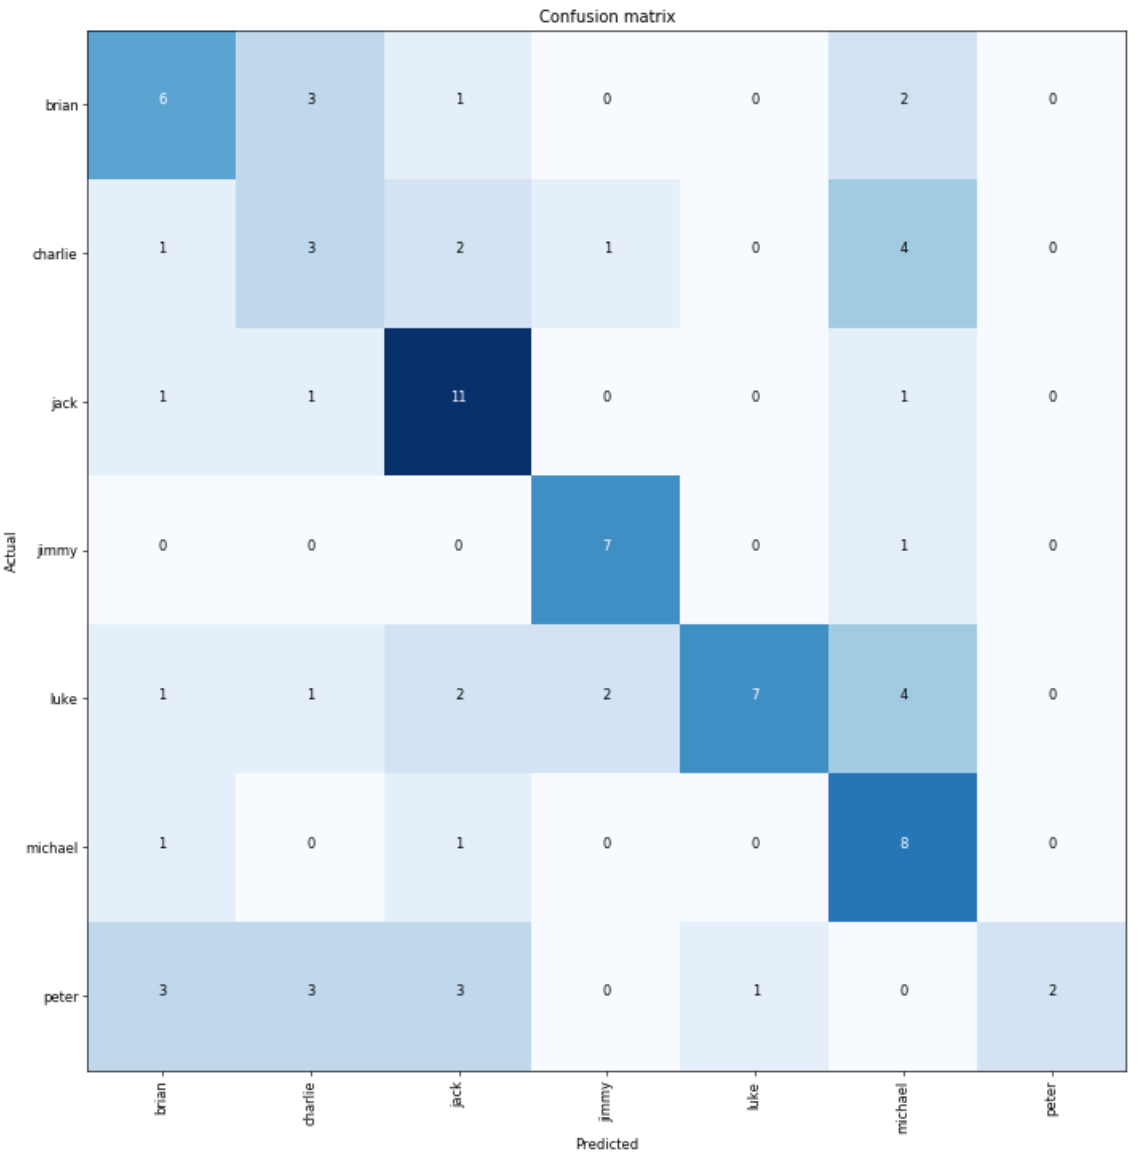
You can get a good sense for the overall performance of the model using this confusion matrix. Darker colors correspond to larger numbers here, which suggests that our model is quite good at detecting my cousin Jack. I'm sort of a mixed bag, along with Peter.
Finally, let's try take a look at a list of the "most confused" labels in the validation set:
interp.most_confused(min_val=2)[('charlie', 'michael', 4),
('luke', 'michael', 4),
('brian', 'charlie', 3),
('peter', 'brian', 3),
('peter', 'charlie', 3),
('peter', 'jack', 3)]I'm actually quite surprised by these results. Michael has long flowing locks, like a modern day Sampson or Casey Jones from the 1990 Teenage Mutant Ninja Turtles movie. I, put simply, do not.
Looks like we've got more work to do.
Fine-tuning our neural network
Before we continue our training, let's first use a handy tool built into fastai to help us identify an ideal learning rate.
learn.lr_find()
learn.recorder.plot()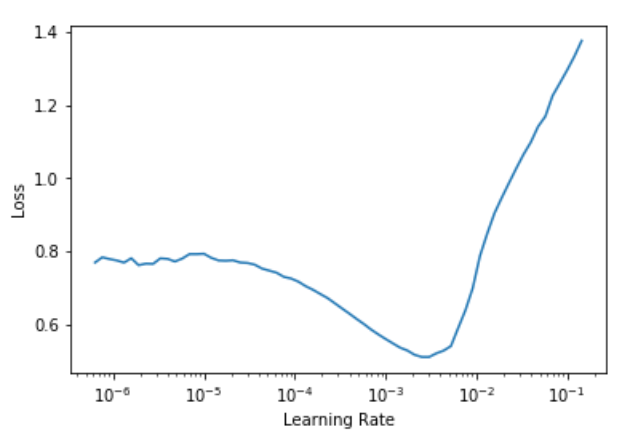
Typically, you'll want to choose a learning rate where the curve is steepest as it moves towards its lowest point. Picking a learning rate, admittedly, is more of an art than a science. But this tool is seriously helpful, and I think you'll find it quite useful in your own projects.
For this fine-tuning portion, I'm going to unfreeze the entire model, including the pre-trained layers. Then, I'll train the model for 10 epochs, using a variable learning rate between 0.0001 and 0.001. Finally, I'll save the updated model.
learn.unfreeze
learn.fit_one_cycle(10, max_lr=slice(1e-4,1e-3))
learn.save('clabby-stage-2')
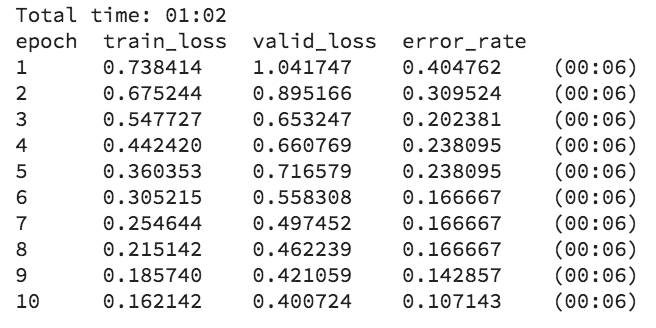
A minute or so later and we're back, now with 89.3% accuracy. I'll throw my model into another Classification Interpreter object for good measure, and take look at the top losses. These seem a bit more reasonable to my trained eye.
Shipping our model to production
With 89% accuracy, I think we're ready to ship this thing to production. Besides, Thanksgiving is right around the corner.
Let's deploy our trained model to an API using a FloydHub serving job.
We'll just need to write a tiny Flask app that can handle HTTP requests. With the addition of a simple Flask app to our project, our trained model will be available as an API that can be used by anything that can send and receive HTTP requests – an iOS app, a pizza-delivery robot, a website, you name it. We can even add a static HTML template to our Flask app, making it even easier for people to try out our model.
If you're following along, you can grab the code for our model API Flask app in this GitHub repo. Here's the five commands you'll need to spin up your own model-serving API on FloydHub.
git clone https://github.com/whatrocks/clabby-classifier
cd clabby-classifier
floyd login
floyd init clabby-classifier
floyd run --mode serve
In a few minutes, you'll be live with your production-ready model API. Here's mine!
Serving overview
Now that you've deployed a trained model on FloydHub, let me briefly touch on the components that go into our model-serving Flask app.
First, we'll want a route to serve our HTML template from the root path:
@app.route('/', methods=['GET'])
def index():
    """Render the app"""
    return render_template('serving_template.html')
The HTML template can be found in the /templates folder. That's pretty easy, and just uses standard Flask Jinja2 templating.
Next, we'll add two helper functions to load our trained model and make predictions:
def load_model():
    path = '/floyd/home'
    classes = ['brian', 'charlie', 'jack', 'jimmy', 'luke', 'michael', 'peter']
    data = ImageDataBunch.single_from_classes(path, classes, tfms=get_transforms(), size=224).normalize(imagenet_stats)
    learn = create_cnn(data, models.resnet34)
    learn.load('clabby-stage-2')
    return learn

def evaluate_image(img) -> str:
    pred_class, pred_idx, outputs = trained_model.predict(img)
    return pred_class
Finally – and this is the most important thing in our app – we'll add a route to evaluate an uploaded image and return the prediction.
@app.route('/image', methods=['POST'])
def eval_image():
    input_file = request.files.get('file')
    if not input_file.filename.lower().endswith(('.jpg', '.jpeg', '.png')):
        return BadRequest("Invalid file type")

    input_buffer = BytesIO()
    input_file.save(input_buffer)

    guess = evaluate_image(open_image(input_buffer))
    hint = fact_finder(guess)
    return jsonify({
        'guess': guess,
        'hint': hint
    })
That's it. Two simple routes, and a few helper functions to do the predictions. That's all you need to create a model serving API on FloydHub.
But what's this fact_finder function all about? Let's take a look.
Unique domain knowledge
Many computer vision tutorials stop with the successful classification of images into your pre-defined labels. Because that's the hard part, right?
But we aren't just building models for the sake of building models. We're building them so that we can do things in the real world. Like determining if we should eat that delicious looking mushroom growing in our backyard. I should, right?
Last week, Jeremy Howard told our deep learning class at the Data Institute at USCF that the real special sauce in deep learning is the application of deep learning with our unique domain knowledge.
Given that there's probably no domain where I have more knowledge than my own family, I decided to code in some suggested topics to talk about (or avoid!) once my model makes a prediction.
import random
facts = {
    'charlie': [
        'ask him about the fast.ai course',
        'he loves pizza',
    ],
    'jack': [
        'loves reading books',
        'studying law right now'
    ],
    'jimmy': [
        'just got his PhD!',
        'loves garfield comics',
    ]
}

def fact_finder(label: str) -> str:
    return random.choice(facts[label])
These hints, along with our world-class image classifier app, should make this year's Day After Thanksgiving family reunion a piece-of-cake for any newcomers!
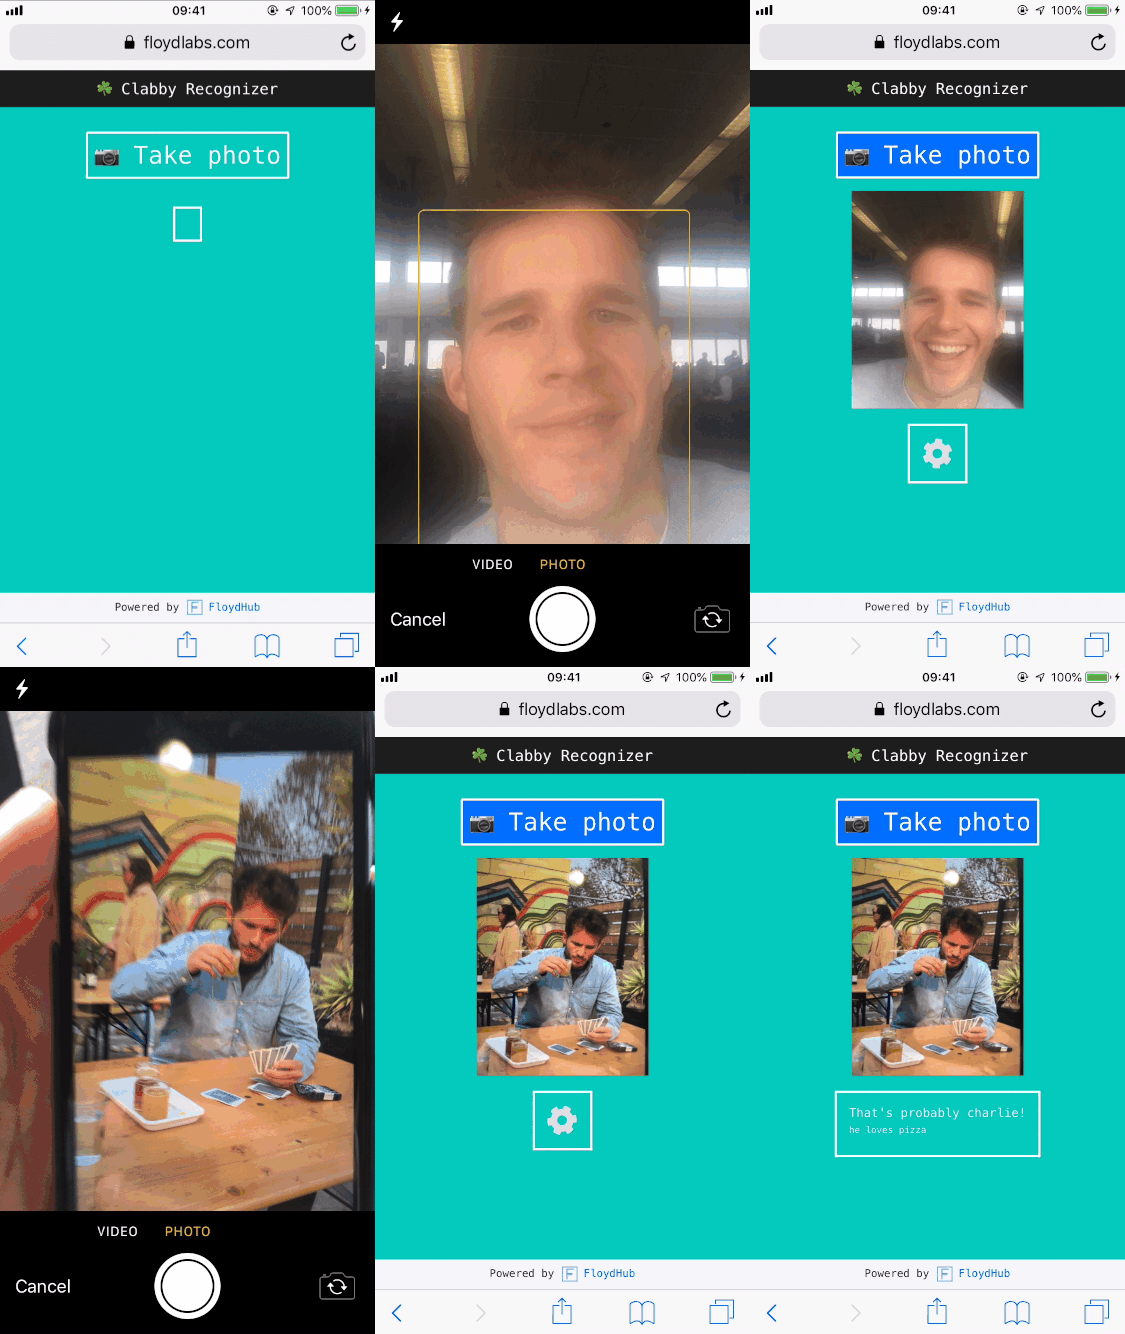
You're welcome, in advance, everyone.
Hungry for more?
If you've come this far and you're still ready for more, then I've got a few tasty ideas for some extensions to our image classification project.
One option is to try out another model architecture. As you might expect, it's quite easy to swap in another architecture with fastai. You might, for example, want to try a ResNet50 architecture, which comes with many more layers than ResNet34 – and might prove more effective at recognizing features in our cousins dataset.
If you want to try out ResNet50, you'll want to first create a new DataBunch, and then create a new CNN learner using the resnet50 pre-trained model:
data50 = ImageDataBunch.from_name_re(path_img, fnames, pat, ds_tfms=get_transforms(), size=320, bs=batch_size//2)

learn50 = create_cnn(data50, models.resnet50, metrics=error_rate)
If mobile apps aren't your thing, then you could try deploying your trained model to your pet robot. Remember – you can integrate your trained model with anything that can send and receive HTTP requests. So, even your cute little Cozmo robot will work.

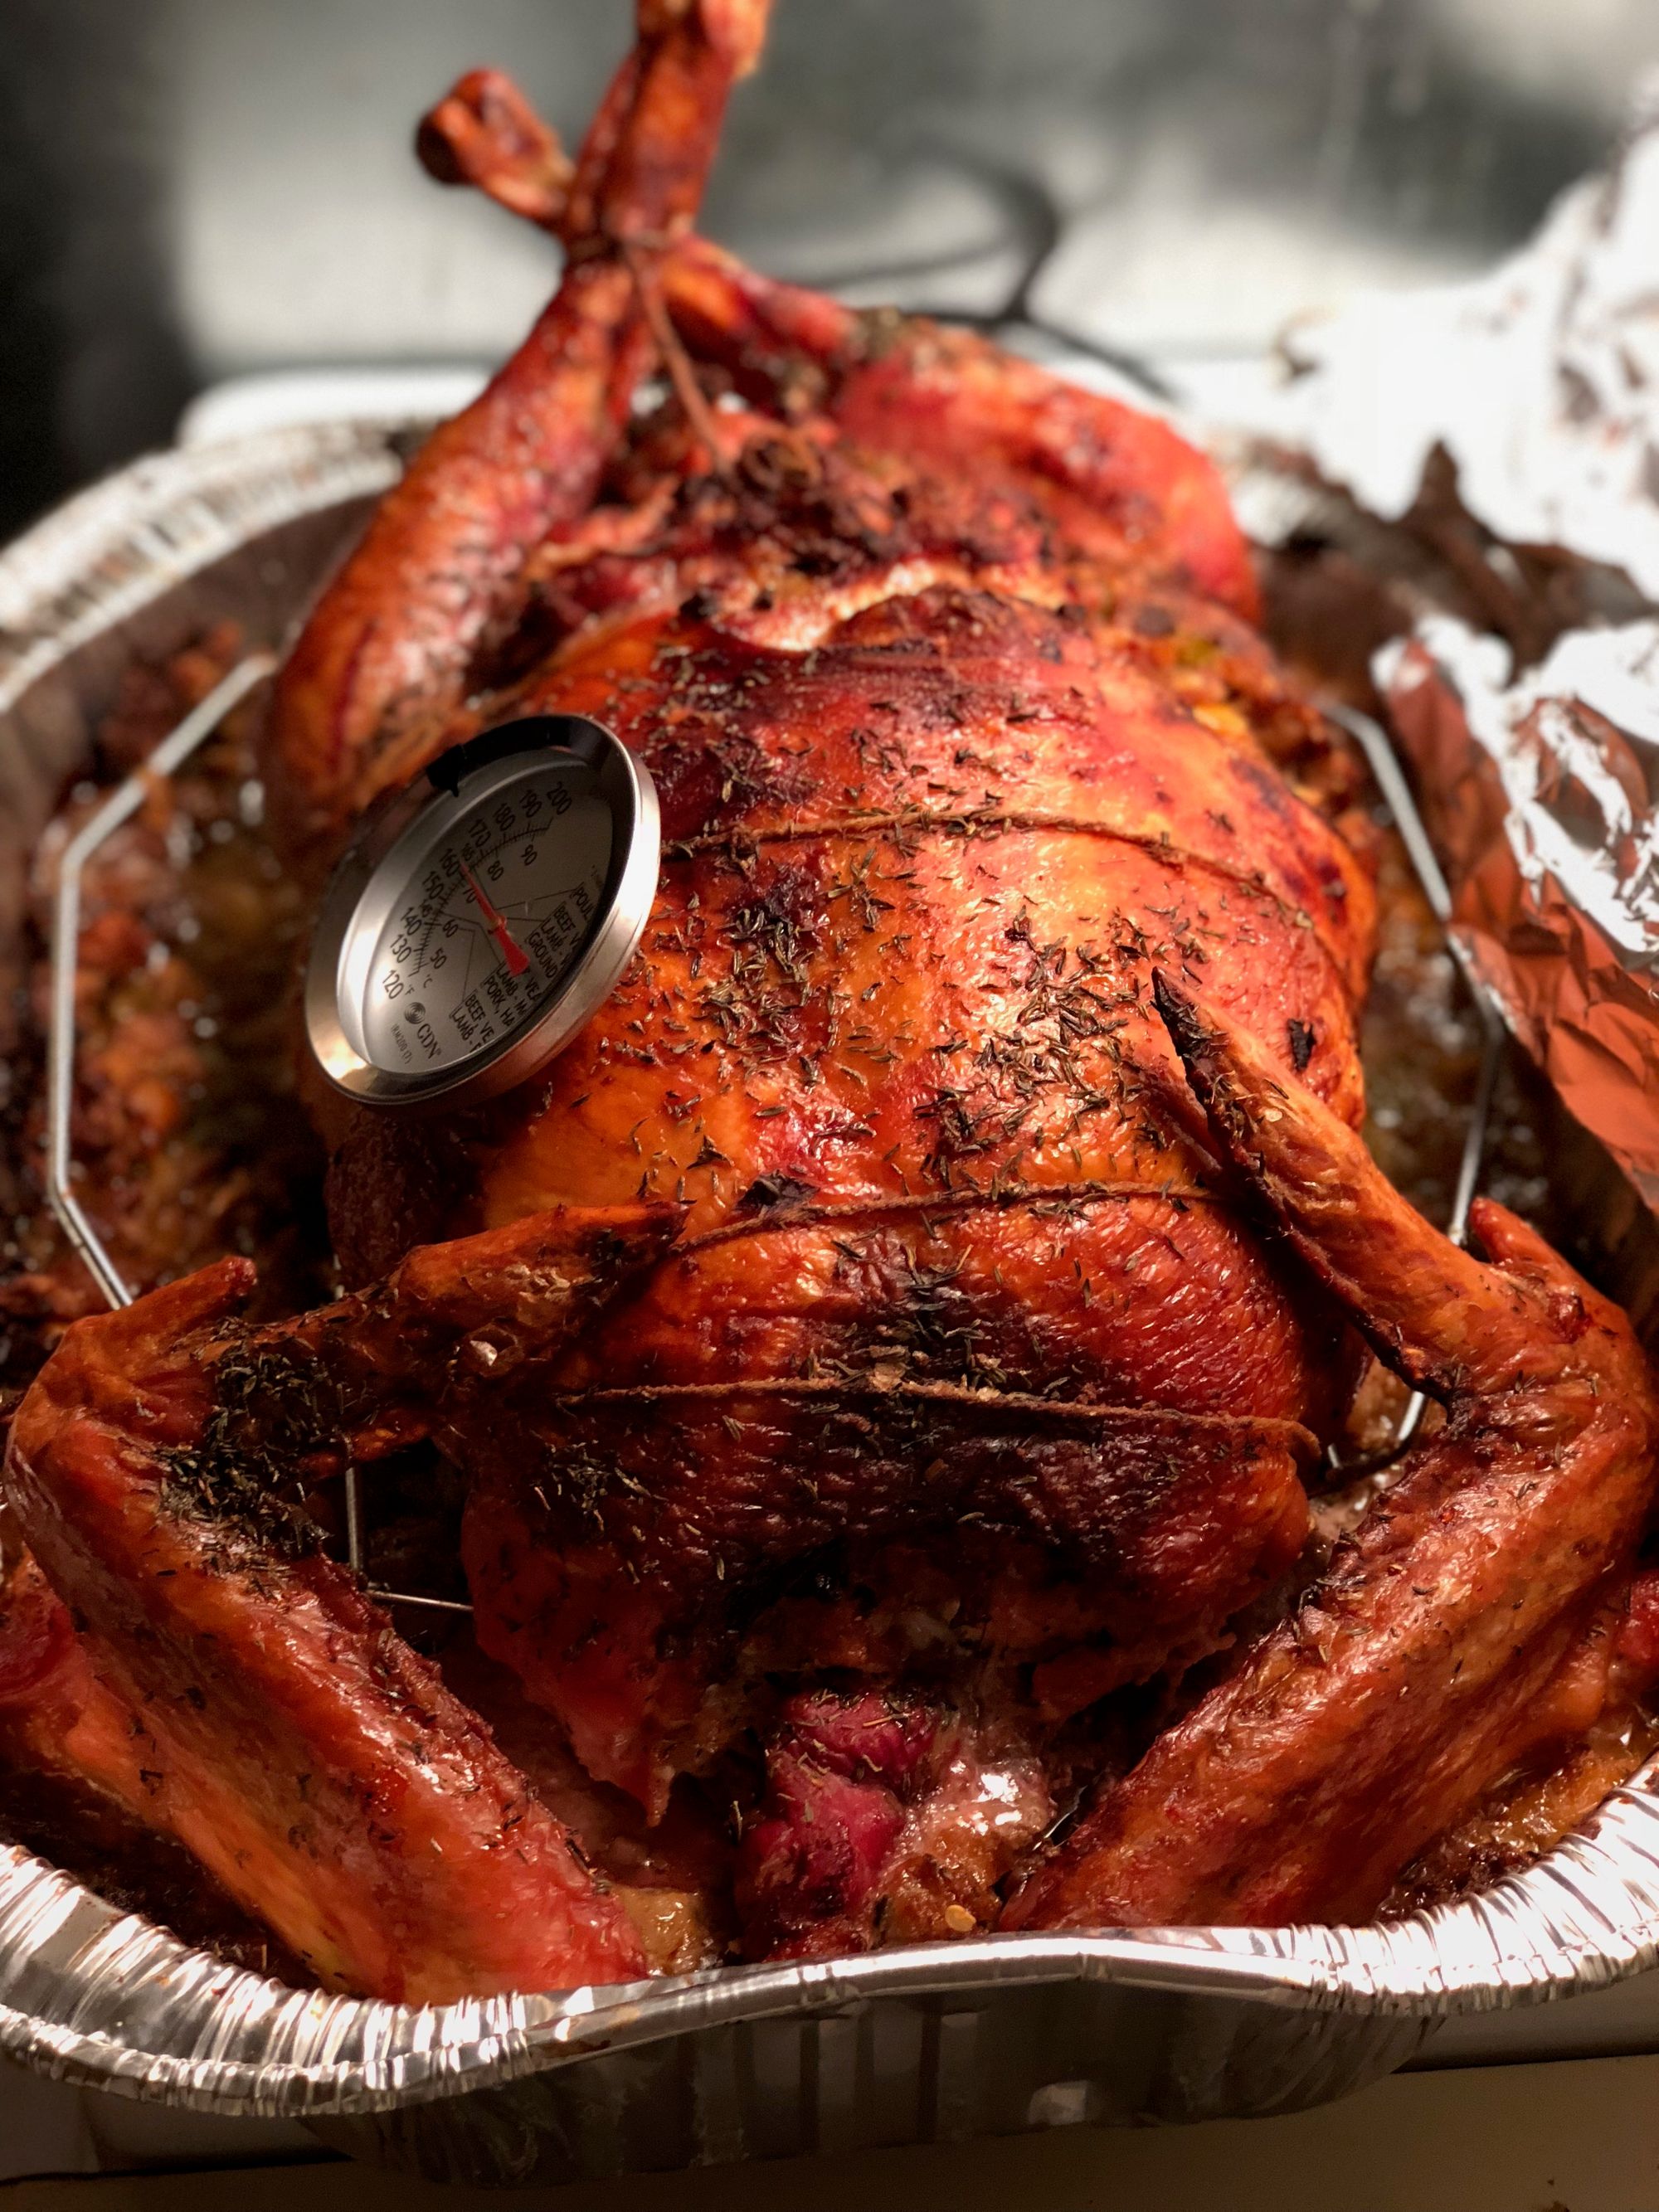
Or maybe you want to try this project with a brand-new dataset? I'd personally love to see a "Turducken-Or-Not" app in the AppStore by this Thursday.
Good luck! Share your Thanksgiving creations with us on Twitter!

